Locker installation is more than placing lockers against a wall. A good installation starts with delivery access, room measurements, user routes, door swing, floor condition, wall space, bench positions, aisle width and future maintenance. When these details are planned early, lockers are easier to deliver, easier to position and easier to use every day.
This UK locker installation guide explains how to plan delivery, positioning and room layout for workplaces, schools, gyms, leisure centres, offices, warehouses, factories, healthcare sites and commercial buildings. It covers the practical checks that help avoid cramped locker rooms, blocked access routes, poor door clearance and awkward installation problems.
The aim is simple. Choose lockers that fit the room, reach the room and work properly once installed. A locker bank may be the right product, but it can still cause problems if delivery access is poor, the room is too tight or the layout does not match how people move through the space.
Quick answer: what should you check before installing lockers?
Before installing lockers, check the delivery route, doorways, lifts, stairs, room size, wall length, floor condition, ceiling height, aisle width, door swing, bench positions, sockets, radiators, fire exits and cleaning access. Also confirm the locker size, depth, door configuration, material and lock type before delivery.
The most common installation problems are caused by poor access planning or poor room layout. Lockers may fit against the wall but still block movement. They may reach the building but not fit through a narrow internal route. They may open correctly when empty but cause congestion during peak use.
| Planning area | What to check | Why it matters |
|---|---|---|
| Delivery access | Vehicle access, unloading area, doorways, lifts and stairs | Ensures lockers can reach the installation room |
| Room dimensions | Wall length, depth, ceiling height and fixed obstacles | Confirms the locker bank fits the room |
| Door clearance | Locker door swing and user standing space | Prevents blocked aisles and awkward access |
| Aisle width | Space between locker rows, benches and opposite walls | Supports safe movement during busy periods |
| Floor condition | Level, stable and suitable floor surface | Helps lockers sit correctly and operate safely |
| Room use | Staff, students, members, visitors or equipment users | Matches layout to real user behaviour |
| Future maintenance | Access to locks, keys, hinges, number plates and cleaning areas | Reduces long-term repair and access problems |
This installation guide should support the complete lockers guide and link sideways to the locker size, door option, material, lock and planning guides.
Why locker installation planning matters
Lockers are long-term storage assets. Once installed, they affect how people move through the room every day. A poor installation can create crowding, blocked routes, damaged doors, difficult cleaning and weak user experience. A good installation makes the locker area feel natural and easy to use.
Planning also reduces delivery problems. Lockers may arrive fully assembled, nested, flat-packed or in sections depending on the product and order. If access routes are not checked, delivery can be delayed or made harder than necessary. Narrow corridors, tight staircases, small lifts and awkward doorways should be reviewed before the order is confirmed.
Good installation planning protects the product and the room. It helps avoid scraping walls, forcing lockers through tight spaces, installing lockers too close to benches or blocking fire routes. It also supports later maintenance because locks, keys, doors and number plates remain accessible.
Checks before ordering lockers
The best time to prevent installation problems is before ordering. Check the site, the users and the room first. Then choose the locker size, material, door option and lock type.
- Count current users and allow for future growth.
- List what users need to store.
- Measure the room accurately.
- Check the full delivery route from vehicle to room.
- Confirm whether lockers need to be assembled, positioned or fixed.
- Check door swing, aisle width and bench positions.
- Confirm whether the room is dry, damp, wet or humid.
- Choose lock types before ordering.
- Plan numbering, keys and spare parts.
- Check whether cleaning access is needed around or below lockers.
Do not choose lockers only from the product dimensions. External size matters, but so does how people stand in front of the lockers, open doors, use benches and move around other users.
Delivery access planning
Delivery access should be checked before the installation date. This includes the route from the delivery vehicle to the locker room. Measure doorways, corridors, staircases, lifts and tight turns. Also check whether there are steps, ramps, thresholds or restricted access times.
Large locker banks may need more space to move safely. Even if the locker fits the final room, it must also fit through the building. Internal access is often the limiting factor in older schools, leisure centres, basements, offices and multi-storey buildings.
Delivery route checklist
- Vehicle unloading area.
- Site access restrictions.
- External steps, ramps or kerbs.
- Main entrance width and height.
- Internal doorway widths.
- Corridor widths and tight corners.
- Lift dimensions and weight limits.
- Staircase width, turns and landings.
- Floor protection requirements.
- Access times and site contact details.
If the access route is tight, confirm the delivery format before ordering. Some sites may need smaller units, sectional delivery or a different installation plan.
Room measurements
Accurate room measurements are essential. Measure wall length, room depth, ceiling height and fixed obstacles. Include skirting, radiators, pipes, sockets, windows, door frames, columns, fire equipment and any wall-mounted fittings.
Take measurements at more than one point. Older buildings may have uneven walls, sloping floors or awkward corners. A locker bank that fits one end of the wall may not fit cleanly along the full run.
| Measurement | Why it matters | Common issue |
|---|---|---|
| Wall length | Shows how many lockers fit in a run | Forgetting door frames, pipes or radiators |
| Room depth | Controls locker projection and aisle width | Choosing lockers that are too deep for the space |
| Ceiling height | Confirms full-height lockers and sloping tops fit | Ignoring low ceilings or beams |
| Door position | Affects routes and locker placement | Locker doors opening into room doors |
| Socket and radiator position | Prevents blocked services | Covering sockets or heat sources |
| Bench position | Affects changing room comfort | Benches blocking lower locker compartments |
For detailed dimension decisions, link this article to the locker size guide. The installation page should focus on whether the chosen locker will fit and work in the room.
Locker positioning
Locker positioning should follow user movement. Place lockers where users naturally need storage, but avoid blocking routes, exits, doors, benches, wash areas or workstations. A good position makes the locker bank easy to reach without turning the room into a bottleneck.
In staff rooms, lockers should be close enough to be useful but not so close that they block seating, kitchen areas or break spaces. Within schools, lockers should support corridor flow and avoid crowded pinch points. In gyms and leisure centres, lockers should support the movement from entry to changing, showering and exit.
- Keep locker runs clear of fire exits and main walkways.
- Do not block room doors, emergency equipment or service panels.
- Position lockers near the correct user route.
- Use corners carefully; they can restrict door opening.
- Avoid placing lockers where open doors block circulation.
- Leave space for cleaning and maintenance.
- Separate staff, visitor and member storage where control matters.
Floor and wall checks
Lockers should be installed on a suitable, stable floor. Uneven floors can cause locker doors to misalign or locker banks to sit poorly. If lockers are placed on soft, damaged or sloping surfaces, extra planning may be needed.
Wall condition also matters where lockers are fixed, restrained or placed close to walls. Check for weak plaster, uneven walls, pipes, cables and services. Do not drill or fix into walls without confirming what is behind them.
In wet areas, floor drainage and cleaning access become more important. Avoid layouts that trap water or make it hard to clean around locker bases. For wet changing rooms, use materials and bases that suit the environment.
Aisles and door clearance
Locker doors need space to open. Users also need space to stand in front of the locker while handling bags, coats, shoes and personal belongings. A locker room can feel too tight if aisle width is planned only around closed lockers.
Door clearance depends on locker width, door configuration and room layout. Single-door lockers often have larger doors. Multi-door lockers may have smaller doors but more users opening lockers at the same time. Both situations need planning.
| Layout factor | Installation impact | Planning action |
|---|---|---|
| Locker depth | Controls how far lockers project into the room | Check remaining aisle width after installation |
| Door swing | Can block routes when open | Allow space for users and open doors |
| Opposing locker rows | Users may open doors on both sides | Increase circulation space where possible |
| Benches | Can reduce usable aisle width | Plan lockers and benches together |
| Peak use | More users open lockers at once | Plan for busy times, not quiet periods |
For door configuration decisions, link this page to the locker door options guide. For space and aisle planning, link it to the locker planning guide.
Benches and changing rooms
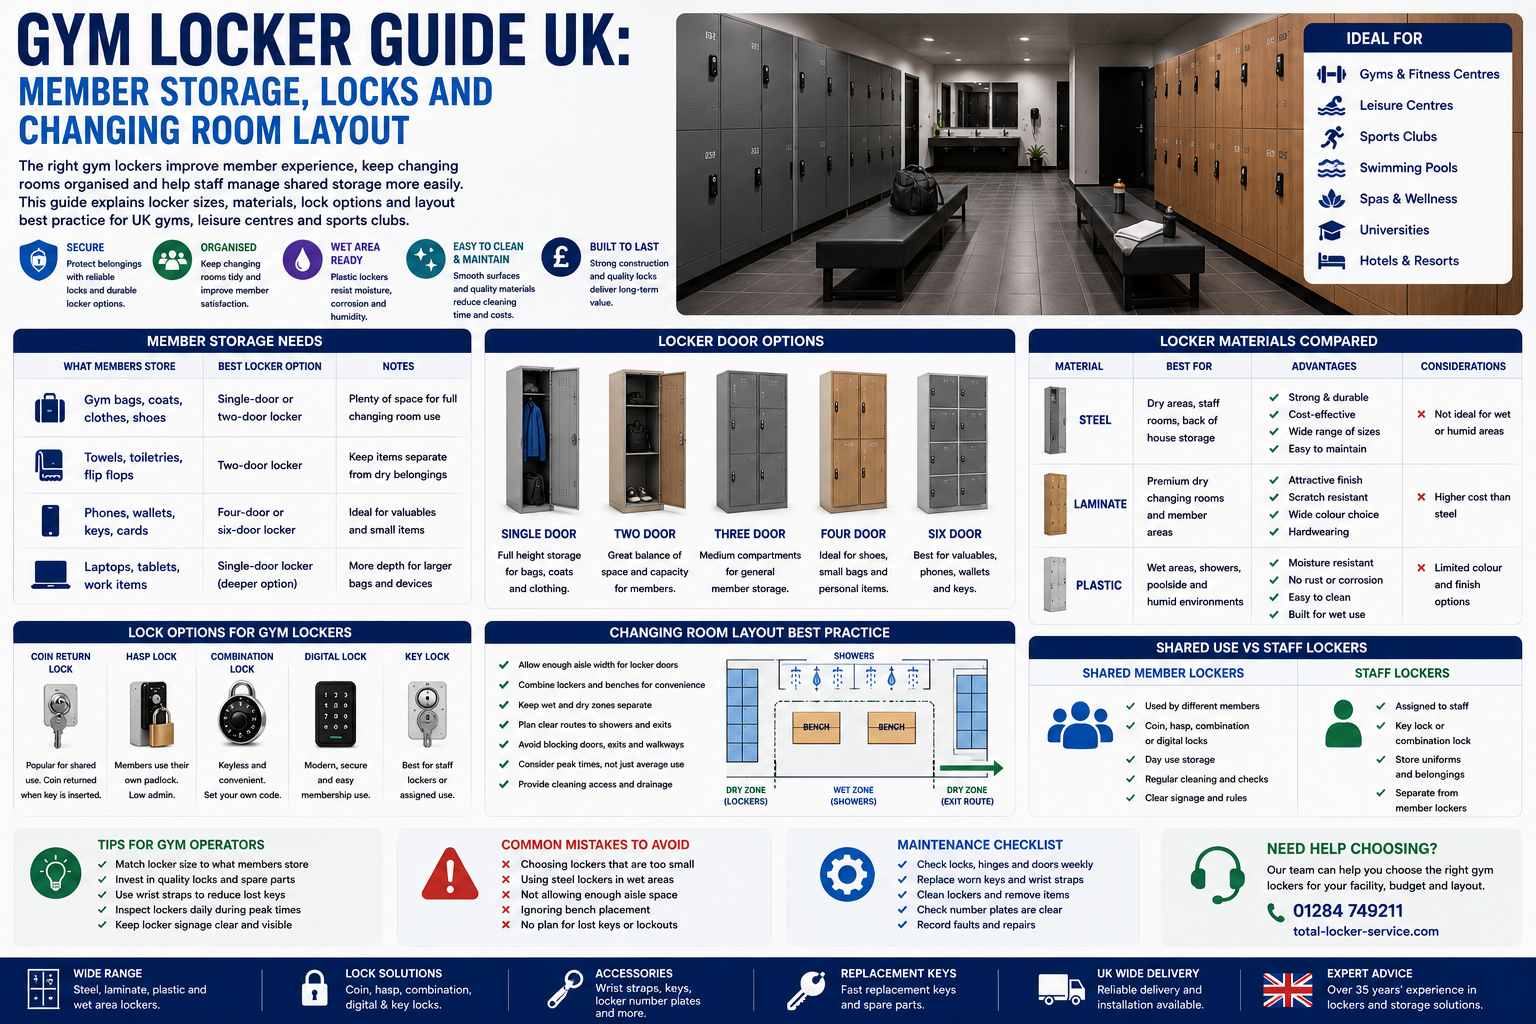
Changing rooms need lockers and benches to work together. Users need space to sit, change shoes, open bags, open locker doors and move around other people. If benches are too close to lockers, they can block lower doors or make the aisle difficult to use.
Plan benches before finalising locker positions. The best layout depends on the room shape, number of users, locker depth, door swing and wet or dry routes. In busy changing rooms, benches placed in the wrong location can cause congestion even when the locker bank is correctly sized.
- Leave practical space between lockers and benches.
- Do not block lower compartments with bench frames.
- Keep main circulation routes clear.
- Use benches to support changing, not obstruct locker access.
- Plan for users carrying bags, towels, shoes and clothing.
- Keep cleaning routes accessible.
Wet areas and changing rooms
Wet areas need extra installation planning. Swimming pools, gyms, spas and shower-adjacent changing rooms expose lockers to moisture, humidity, cleaning routines and wet user movement. The locker material, position and base arrangement should suit those conditions.
Standard steel lockers are usually best for dry indoor areas. Plastic or wet-area lockers are usually better near pools, showers and humid spaces. Laminate lockers may be suitable in premium dry or semi-dry changing rooms if the full construction fits the environment.
Start by mapping the wet and dry routes through the changing room. Identify the entrance, shoe-changing area, showers, benches, locker banks and exit route. Then check how wet users and dry users move through the space. Lockers should support that flow, not fight it.
For wet facilities, link this page to the wet area locker guide, plastic locker guide and gym locker guide.
Locker installation planning by sector
Different sites need different installation priorities. A school corridor, office, warehouse and gym changing room should not be planned in the same way.
Workplace locker installation
Workplace lockers are often installed in staff rooms, changing areas, warehouses, factories and welfare spaces. Plan around shift changes, PPE storage, staff routes and available wall space. In industrial settings, deeper or larger lockers may be needed for workwear, boots and bags.
Recommended route: workplace lockers.
School locker installation
School lockers often sit in corridors, classrooms, changing rooms or common areas. Installation should protect corridor flow and avoid pinch points. Door swing, student movement and supervision should be considered before deciding the final position.
Recommended route: school lockers.
Gym and leisure locker installation
Gym and leisure lockers must support member routes through changing rooms, showers, benches and activity areas. Wet and dry zones should be planned carefully. Plastic lockers may be required in wet areas, while laminate or steel may suit dry zones depending on appearance and budget.
Recommended route: leisure lockers.
Office locker installation
Office lockers often support hybrid working, personal storage, hot desks and visitor storage. Position lockers near staff routes but away from doorways, meeting room entrances and crowded circulation points. If devices need charging, plan sockets and cable management before ordering powered lockers.
Recommended route: charging lockers for powered device storage.
Maintenance access after installation
Installation should allow future maintenance. Locks, keys, hinges, number plates, wrist straps, bases and tops may all need inspection or replacement over time. If lockers are packed into a room too tightly, simple repairs become harder.
Leave enough access for cleaning, lock replacement, key management and condition checks. In wet areas, make sure bases and floor areas can be cleaned properly. In schools and gyms, keep numbering clear so staff can find faults quickly.
- Keep locker numbers visible.
- Record lock types and key codes.
- Allow staff to access locks and hinges for repairs.
- Plan cleaning routes around bases and corners.
- Do not block service panels or sockets.
- Keep spare keys and replacement parts controlled.
For aftercare, link this article to the locker maintenance guide and locker estate management guide.
Common locker installation mistakes
Most locker installation problems are avoidable. They usually come from measuring only the wall and forgetting delivery access, door swing, benches and user movement.
- Not checking the delivery route before ordering.
- Forgetting lift, stair and doorway restrictions.
- Choosing lockers that fit the wall but block the aisle.
- Ignoring locker door swing.
- Placing benches too close to locker doors.
- Blocking sockets, radiators, fire equipment or access panels.
- Using standard steel lockers in wet or humid changing rooms.
- Installing lockers where cleaning access is poor.
- Not planning key, lock and number plate management.
- Choosing maximum locker count over practical use.
The strongest installation plan starts with the whole route: delivery vehicle, building access, room access, locker position, user movement and maintenance access.
Locker installation planning checklist
Use this checklist before confirming a locker order or installation plan.
| Check | Confirmed? |
|---|---|
| Delivery vehicle can access the site | Yes / No |
| Unloading area is available | Yes / No |
| Doorways, corridors, stairs and lifts are measured | Yes / No |
| Room wall length and depth are measured | Yes / No |
| Ceiling height and obstacles are checked | Yes / No |
| Locker depth and door swing are allowed for | Yes / No |
| Aisle width is suitable for users | Yes / No |
| Benches are planned with locker access | Yes / No |
| Wet or dry environment has been confirmed | Yes / No |
| Floor condition is suitable | Yes / No |
| Sockets, radiators and services are not blocked | Yes / No |
| Lock type and key management are planned | Yes / No |
| Cleaning and maintenance access is available | Yes / No |
| Future user growth has been considered | Yes / No |
Final recommendation
Locker installation should be planned before the lockers arrive. Check the delivery route, room measurements, floor condition, wall space, locker depth, door swing, aisle width, benches and user movement. The right locker system should fit the building, fit the room and fit the way people use the space.
For workplaces and dry staff areas, steel lockers may be practical and cost-effective. Where there are premium visible spaces, laminate lockers may be suitable. For wet changing rooms, plastic or wet-area lockers may provide better long-term value. For device storage, powered charging lockers may be needed.
Total Locker Service supplies lockers, workplace lockers, school lockers, leisure lockers, charging lockers, locker locks, replacement keys and accessories for UK workplaces, schools, gyms, leisure centres and commercial buildings. Browse commercial lockers, view workplace lockers, or call 01284 749211 for help planning locker delivery, positioning and installation.
Locker installation FAQs
What should I check before installing lockers?
Check the delivery route, doorways, lifts, stairs, room size, wall length, ceiling height, locker depth, door swing, aisle width, benches, floor condition and any fixed obstacles before installing lockers.
How do I know if lockers will fit in the room?
Measure the wall length, room depth and available aisle space. Allow for locker projection, open doors, benches and users standing in front of the lockers. Do not rely on wall length alone.
Do lockers need to be fixed to the wall?
Some locker installations may need fixing, nesting or restraint depending on the locker type, layout, height, site use and safety requirement. Check the product and site conditions before installation.
How much space should be left in front of lockers?
Enough space should be left for locker doors to open and for users to stand, move and access belongings safely. Changing rooms and high-traffic areas usually need more practical circulation space than simple storage rooms.
Can lockers be installed in changing rooms?
Yes. Lockers can be installed in changing rooms, but benches, door swing, wet and dry routes, cleaning access and material suitability must be planned carefully.
What lockers are best for wet changing rooms?
Plastic or specialist wet-area lockers are usually best for wet changing rooms, swimming pools, shower-adjacent spaces and humid leisure environments because they resist moisture better than standard steel lockers.
What can go wrong with locker installation?
Common problems include poor delivery access, lockers too deep for the room, doors blocking aisles, benches placed too close, sockets or radiators being covered and wet-area lockers being specified incorrectly.
Should lockers be installed before or after benches?
Lockers and benches should be planned together before either is installed. The best sequence depends on the room, but bench positions should never be treated as an afterthought because they affect door access and circulation.
Do charging lockers need extra installation planning?
Yes. Charging lockers need planning for power, sockets, cable routes, ventilation, device size and safe user access. Standard locker placement checks still apply.
Who supplies and advises on lockers in the UK?
Total Locker Service supplies lockers, workplace lockers, school lockers, leisure lockers, charging lockers, locker locks, replacement keys and accessories for UK workplaces, schools, gyms, leisure centres and commercial buildings.